Wednesday 23 December 2020

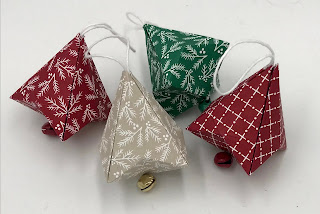
Lidded Pyramid Box Using In the Pines Stamp Set


It's almost Christmas, so time for my final Christmas table favour of the series! This time I've taken inspiration from a very similar origami box I've seen, but this one doesn't use origami! 

It's a 2 part box - a small sloping sided box to put some goodies in, and a pyramid lid. I designed the box & then realised that it was the perfect size for the larger tree from the In the Pines stamps, so I've stamped & heat embossed one on each side. 

If you prefer, you could make it out of DSP, as it just takes 2 pieces of 6" x 6" paper. I've also made some from the lovely Feels Like Frost papers, although in the example below, I used more strands of ribbon!


Hope you like it!

Thanks for stopping by

Jane x


Instructions:


Base


6”x 6” paper


On all 4 sides, Score @  7/8”, 1 3/4” & mark @ 2 1/2”, 3 1/2”


Score lines from each corner of the centre square to each of the 2 closest marks. as in 1st diagram below  


Remove sections as in 2nd diagram.


Adhere tabs, noting that the slides should slope in.


Fold over & adhere 2 adjacent flaps


Position approx 15-18” twine or ribbon so that the centre is between the 2 flaps that haven’t been glued down.


Fold over & adhere the flaps so that ribbon is held under the flaps, with the loose ends coming out of 2 opposite corners. 


LID


Score on wrong side @ 3”. Turn 90° & repeat.


Turn to right side & mark @ 1 3/4”, 4 1/4” on all 4 sides


Score across the corners from mark to mark as in 1st diagram.  


Now score lines across from each end of each of those score lines to the opposite end of the score line diagonally opposite, as in the 2nd diagram.


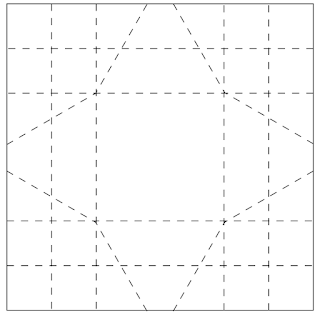
Assemble as instructed in the video. 

Thursday 3 December 2020

Christmas table favour #5 Pyramid Box Using Feels Like Frost DSP


This fun little box is the latest in my series of Christmas table favours and is about the right size for a chocolate!

I got the idea from a similar shaped box I saw that Mitosu Crafts had made, although they made theirs in a different way from mine!

For this one, I've used the Beautiful Feels Like Frost paper, and a piece of our Whisper White crinkled seam binding ribbon.

Hope you like it

Thanks for stopping by

Jane x


Instructions:

4” x 4” DSP or other square piece of DSP (works best in multiples of 1"/4cm)


Mark each side at 3/8 of the way from each end for this example that is 1 1/2", 4 1/2”


Score diagonal lines from the LH mark on one side to the RH one on the next side clockwise.


Repeat for all sides


Score diagonal lines from each corner of resultant centre square to each of the adjacent corners of the paper


Cut away the triangles marked on the template


Fold & burnish


Punch a hole in each point & use ribbon to close


Monday 30 November 2020

Christmas Cracker for a Lipstick using Feels Like Frost DSP


I've been teaching my zoom class a selection of Christmas table favours recently. Nothing says Christmas table more than a Christmas cracker!

The cracker I taught them uses a piece of 6" x 6" DSP (Designer series paper) and would fit a couple of chocolates inside, I'll give you the instructions for that one below. 

As one of my class wanted to gift some lipsticks, I've designed this cracker to perfectly fit a lipstick. It uses 4" x 6" DSP,  so you'd get 6 out of a piece of 12" paper! 

For this one I've used the beautiful Feels Like Frost DSP & tied it with some of our Seaside Spray Metallic Ribbon.

Hope you like it

Thanks for stopping by

Jane x


Measurements:

For the Lipstick Sized Version:


Start with 4" x 6" (10.2cm x 15cm)

Score Short side @ 7/8", 1 3/4", 2 5/8" 3 1/2" (2.3, 4.6, 6.9, 9.2cm)

& on the long side @ 3/4", 1 1/2", 4 1/2", 5 1/4" (1.7, 3.5, 11.5, 13.3cm)

Flip top to bottom & score @ 1 1/8", 4 7/8" (2.6, 12.4cm)


For the Chocolates sized version:


Start with 6” x 6” ( if using metric trim to 15 x 15.2cm)

Score (LS) @ 1 3/8”, 2 3/4”, 4 1/8”, 5 1/2” (3. 5,7, 10.5, 14cm)

Turn 90° & score @ 1”, 2”, 4”,5” (2.5, 5, 10, 12.5cm)

Flip top to bottom & score at 1 1/2”, 4.5” (3.75, 11.25cm)


Alternatively, To make numbers easier in metric trim to 14 x 15.2cm

Score LS @ 3. 5, 7, 10.5, 14cm

Turn 90° & score @ 3, 5, 9, 11cm 

Flip top to bottom & score at 4, 10cm


Thursday 26 November 2020

Christmas Table Favour #3 Hexagonal Twist Close Box


 One of the lovely things about being a Stampin' Up! demonstrator is sharing ideas & inspiration with fellow demonstrators. In a recent zoom meeting one of my friends & fellow demonstrator showed us a beautiful box she'd made. You can see her video here

As soon as I saw her box, I knew a smaller version would make a lovely table favour. So I've designed this one, which is just the right size for a Lindor chocolate. Yummy!

Hope you like it

Thanks for stopping by

Jane x


Instructions:


Start with 4 7/8” x 3 3/8” (13 x 8.8cm)


Score on LS @ 3/4”, 1 1/2”, 2 1/4”, 3”      , 3 3/4”, 4 1/2” (2,4,6,8,10,12cm)

        & mark @ 3/8”, 1 1/8”, 1 7/8”, 2 5/8”, 3 3/8”, 4 1/8” (1 ,3,5,7,9 ,11cm)


Turn 90ยบ so that the narrow section is at the bottom & score @ 1 5/16”, 2 11/16” (3.5,7cm)


On reverse side, Score diagonal lines from the mark to the bottom LH corner of each rectangle that makes up lid.


Fold & burnish all score lines.


Round lid corners (optional).


Monday 23 November 2020

Christmas Bauble Using Feels Like Frost DSP


I've been asked recently to do a video for this lovely Christmas Bauble. I first saw how to make these on a video from a German Stampin' Up! demonstrator, Jana Muller. Although her video is in German, I managed to follow how she was making them.

For my version I thought I'd make a slightly smaller version, using Feels Like Frost 6" x 6" paper. I'll include the measurements for the larger version, as well as my smaller version, below. The method of putting it together is exactly the same whichever size you choose to make, although you'll need a slightly larger circle to score around, for the larger version. 


Hope you like it

Thanks for stopping by

Jane x


Instructions:

For the smaller bauble, start with a piece of DSP measuring 6" x 3 3/8"(15.2 x 9cm)

Score on the long side @ 1/2", 2 1/8", 3 1/4", 4 7/8", 5 1/2" (1.5, 5.7, 8.7, 12.9, 14.4cm)

Cut into 3 strips each measuring 6" x 1 1/8" (15.2 x 3cm)

Use a circle measuring approx 2 1/8" (5.4cm) as a guide for scoring the arcs. eg 2nd smallest stitched circle die or the 4th smallest layering circles die.


For the larger bauble, start with a piece of DSP measuring 8 1/4" x 4 1/2"(21 x 12cm)

Score on the long side @ 3/4", 3", 4 1/2", 6 3/4", 7 1/2" (2, 7.5, 11.5, 17,19cm)

Cut into 3 strips each measuring 8 1/4" x 1 1/2" (21 x 4cm)

Use a circle measuring approx 2 5/8" (6.7cm) as a guide for scoring the arcs. eg 2nd largest stitched circle die or the 3rd largest layering circles die.


Sunday 22 November 2020

German Bell Christmas Decoration Using Classic Christmas DSP


For me, personalised Christmas decorations & cards mean so much more than shop bought ones! Handmade Christmas cards always get pride of place, and our tree has loads of handmade decorations, with my personal favourites being some my sister made for me many years ago!

So when I saw these German Bell decorations a few years ago, I knew I had to make some! This is one of the first ones I made.

So this year I thought I'd make some slightly smaller ones, using the Classic Christmas DSP & our Jingle Bells embellishments. They are fairly simple to make, and the only extras you'll need are some adhesive & some twine to hang them on your tree! 


Hope you like them!

Thanks for stopping by

Jane xx


Thursday 5 November 2020

Faceted Self Closing Pouch using Feels Like Frost DSP


Ever have one of those days?! Well I had one of them when I tried to video the instructions for this lovely faceted pouch! But every cloud has a silver lining, so taking 4 attempts to video this, means I have 4 examples of different sized pouches to show you! 

They are all made exactly the same way, and all the instructions are exactly the same, with just one exception - the size of the piece of paper you start with! 

I've used the beautiful Feels Like Frost 6"x6" Papers, in the video - I accidentally called it First Frost in the video, but didn't want to record it again, just for that mistake! 

For the tallest of the examples in the picture, I used Snowflake Splendor DSP as this one needed a larger piece!

Hope you like them

Thanks for stopping by

Jane x


Instructions:

Start with a piece of DSP 6" (15.2cm) wide.

The height of your DSP will depend on the size of pouch you want to make. For the examples in the picture, I've used DSP of height 4" (10cm), 5" (12.5cm), 6" (15.2 cm) & 7 1/2" (19cm)

Score @ 7/8" (2cm) from the top of your piece of paper.

Turn 180° & score @ 1 3/8" (3.5cm) from the bottom

Turn 90° so that the narrower section is at the top and score @ 2 3/4", 5 1/2" (7,14cm)

Turn 180° and score @ 1 7/8", 4 5/8" (4.5, 11.5cm) to first score line only

Now with short score lines at the bottom, score diagonally from each of the short score lines to the top corners of the panel above.

Cut up all 4 score lines in bottom section & remove section marked on template.

Fold & burnish all score lines.

Adhere tab to other end, round top corners & punch hole for ribbon

Fold in all 4 tabs at bottom, forming a square bottom & adhere.


Monday 2 November 2020

Easy Snowflake Splendor Origami Christmas Table Favour


Christmas is fast approaching, so it's time to start preparing table favours! I've been teaching a few ideas to my zoom class, so I thought you might like to see them too! 

This first one is a very easy one! All it takes is a square piece of paper, and some embellishments to decorate it! Perfect for some chocolate mints for after Christmas dinner!

Hope you like it!

Thanks for stopping by

Jane xx


Saturday 22 August 2020

Flip Fold Card using Stampin' Up's Forever Fern


The Forever Fern stamp set is a beautiful set of images. It's a 'Distinktive' set which means that the stamped images contain all the shading you need, so that you get a beautiful realistic image every time, without the need to be an expert at colouring! What's not to love about that?! 

So I thought it would be perfect for this card, which I taught in my zoom class this week. It's a flip fold card, which flips over the centre panel as you open the card.


I also made another of this style of card recently for a friend who recently had twins! I hadn't got any twin baby greetings, so I decided to make a card that said 'Welcome Baby' on the front, and then '& Baby' on the flip side!!


This time, though, I added an extra panel for signing the card, I'll give you instructions for both styles below.

Hope you like it!

Thanks for stopping by

Jane x

Instructions


Cardstock 5 3/4” x 6 3/4” (14.5 x 17 cm)


On the Long side, 


cut @ 1 1/4” & at 5 1/2” from 1 1/4” to 4 1/2” ONLY.     (@ 3cm & 14 cm from 3cm to 11.5cm)


score @ 2 3/4” from 0 to 1 1/4”  & from 4 1/2” to 5 3/4” (@ 7cm from 0 to 3cm & 11.5 to 14.5cm)


Flip from top to bottom, 


score @ 4” from 0 to 1 1/4”  & from 4 1/2” to 5 3/4” (@ 10cm from 0 to 3cm & 11.5 to 14.5cm)


Turn to the short side


Cut @ 1 1/4” & 4 1/2” from 1 1/4” to 2 3/4” & 4” to 5 1/2” 

                                                                                (@ 3 & 11.5cm from 3 to 7cm & 10 to 14cm)

NB these cuts connect the previous cut lines to the adjacent score line


Your card should now look like this


Fold & burnish the score lines, to form a zig zag from the outer part of the card. The centre panel will flip over when the card is opened & closed.


If you prefer to have an extra panel for signing, then start with a piece of cardstock 5 3/4” x 11 1/16” (14.5 x 28.1cm)

Follow all the instructions above, then score on the long side, with the above cuts/scoring towards the right. Score @ 4 1/4” (11cm). 

Your card will look like this


Decorate this panel with a piece of contrast card 4 1/8” x 5 5/8” (10.7 x 14.2 cm) & a stamped panel of Whisper White 4” X 5 1/2” (10.4 X 13.9cm)


To decorate the flip card:


Contrast Card Layer (if you don’t want to use a contrast card layer, then use these cutting instructions for your DSP)


Cardstock (or DSP) 6 3/8” x 5 5/8” (16.1 x 14.2cm)


On the long side 

Cut @ 1 1/8” & 5 1/4” from 1 1/8” to 4 1/2” (@ 2.7 & 13.4cm cut from 2.7 to 11.5cm)


On the short side

Cut @ 1 1/8” & 4 1/2” from 1 1/8” to 5 1/4” (@ 2.7 & 11.5cm cut from 2.7 to 13.4cm)


This should remove the centre section.


Now cut on the long side @ 2 5/8” (6.7cm)

Turn through 180ยบ and repeat.


It should look something like this


Now cut the centre panel to measure 4 1/8” x 3 1/8” (10.7 x 8.2cm)

Cut another piece of cardstock to the same measurements.


DSP layer

Start with a piece measuring 6” x 5 1/4” (15.2 x 13.9cm)


On the long side 

Cut @ 1” & 5” from 1” to 4 1/4” (@ 2.4 & 12.8cm cut from 2.4 to 11.5cm)


On the short side

Cut @ 1” & 4 1/4” from 1” to 5” (@ 2.4 & 11.5cm cut from 2.4 to 12.8cm)


This should remove the centre section.


Now cut on the long side @ 2 1/2”(6.4cm)

Turn through 180ยบ and repeat.


Your DSP should look like the template above.


Now adhere the DSP panels to the corresponding Contrast Card panels, and adhere the resultant panels to the base card in the corresponding sections. 


Panels for the flip section

2 Whisper White (or DSP) 4” x 3” (10.4 x 7.9cm)


NB Be careful how you stamp/decorate the front panel, as the left hand edge of this one will be obscured by the surround. 


Adhere these panels to the contrast card panels, then adhere to your card. NB if you lay the card out flat to do this, then the reverse panel (flip side) needs to go on the same side as your DSP. The panel you will see from the front goes on the undecorated side. 


Saturday 1 August 2020

Theatre Card Using Pampered Pets


Aren’t these dogs so cute? When I saw the Pampered Pets Suite in the Annual Catalogue, I knew I wanted to try a Theatre Card, and the dogs are just so cute!

The card folds flat for posting, and when you pull from the thumb notches, the ‘curtains’ open to reveal your greeting! 


I love it!

Hope you like it!

Thanks for stopping by
Jane x


Instructions

Using an A4 piece of cardstock, cut 2 Pieces at 5 3/4” x 8 1/4” (14 x 21cm)
NB Keep the offcut, we’ll use it later!

Cut each of the 2 pieces at 4 1/8” (10.5cm) giving you 4 pieces of 5 3/4” x 4 1/8” (14 x 10.5 cm)

Now cut 2 of those pieces at 3 3/4” (9.5cm) giving you 2 pieces of 5 3/4” x 3 3/4” (14 x 9.5 cm)
                                                                                                & 2 of 5 3/4” x  3/8”   (14 x 1cm)

Attach DSP 5 5/8” x 4” (13.5 x 10cm) to one of the 4 1/8” (10.5cm) pieces making sure you glue the whole piece.

Using the 4th largest Stitched Rectangle, cut an aperture in the centre of this piece. 

Now line up the frame piece with the other 4 1/8” (10.5cm) piece (the back section) so that all the outer edges match. Apply glue to the back of the centre piece and reinsert it into the centre of the frame so that it adheres to the back in line with the frame aperture. 

Cut thumb notches, using a small circle punch (1”) either side of the aperture.

Score each of the 3 3/4” (9.5cm) pieces at 7/8”, 2 7/8” (2cm, 7cm) Fold & burnish the score lines.

Attach DSP 5 5/8” x 1 7/8” (13.5 x 4.5cm) & 5 5/8” x 2 3/4” (13.5 x 6.5cm) to the 2 larger sections.
NB If your DSP is directional these need to be opposite ways up on the 2 pieces of cardstock - for a fuller  explanation please see the video!

Using the 3/8” (1cm) pieces, wrap around the scored pieces to form tabs on each end of the narrow pieces. They should be fairly tight but not so tight that the card can’t move through these bands. Attach the bands to the back of the frame piece close to the side of the aperture and central between the top & bottom.

Attach the scored pieces to the sides of the back, by applying glue to the section without DSP, ensuring that it is central between top & bottom of the back. When you attach these, the DSP side will be facing the back, So fold them on the centre score line, so that the larger piece of DSP now faces the top.

Thread these through the bands.

To stop these unthreading, use the offcut from the A4 piece. Fold it in half & glue together, then repeat, so that you get a piece that is 4 layers thick. Cut that into 4 pieces. Glue each of these close to the corners on the back of the ‘curtains’


Friday 10 July 2020

Pop Up Vase Card Using Magnolia Memory Dies


Today, I have an updated version of an old card to show you. I made the original in a class I attended, run by my friend and mentor Tracey Allen of Stamp & Scrap UK. It was one of the first Stampin' Up! cards I ever made!

This time I've used the Magnolia Lane suite. I love the colour combination of Mossy Meadow & Petal Pink! Unfortunately the papers are now retired, but I think it would look lovely in the Peony Garden DSP which is in the new Annual catalogue.

My flowers were cut using the Magnolia memory dies, and I also used a die cut from the Forever Flourishing dies to add some greenery. 

The greetings were from the Peaceful Moments stamp set, and mounted onto a die cut from the Painted Labels dies.


Hope You Like it

Thanks for stopping by

Jane x


Measurements:

Card Base is 1/2 a sheet of Petal Pink A4 folded in half.

Card front:                 DSP: 3 of 3 3/4" x 1 11/16" (9.5cm x 4cm)
Mossy Meadow cardstock: 3 of 3 7/8" x 1 13/16" (10cm x 4.5cm)

Inside: Mossy Meadow Cardstock: 3 5/8" x 5 3/8" (9.5cm x 14cm)
             Whisper White Cardstock: 3 3/8" x 5 1/8" (8.5cm x 13cm)

You will also need 
DSP 2 1/4" x 5" (6cm x 12.5cm) Score on short side @ 3/4", 1 1/2" (2cm,4cm)
                                                         and on long side @ 1" (2.5cm) from each end

1 piece Petal Pink Cardstock 2" x 1/2" (5cm x 1.5cm)

1 piece Petal Pink Cardstock 3 7/8" x 3/4" (10cm x 2cm) scored @ 3/8" (1cm)

Several strips of Mossy Meadow Cardstock 1/2" (1cm) wide and at least 4" (10cm) long


Friday 3 July 2020

Ribbon Reel Box


I love Stampin’ Up! Ribbons, but mine usually end up slowly unravelling in a box & getting all tangled up! So when I saw fellow demonstrator, Esther Howard (Stampin’ Star Creations) making boxes to store them in, I thought what a good idea! So, I’ve now got all my ribbons organised & can see what I have when I open the box! Much better! 


I’ve redesigned the box, to make it a little easier for me, and been brave enough to even make my first video! My video technique, particularly staying in shot, needs to improve, but it’s a start! 


Hope you like it!


Thanks for stopping by


Jane x


Monday 8 June 2020

Sunset Card using Sailing Home Stamp set


Where do you get your inspiration from? For this card, I took inspiration from.a photo of a sunset at  Point of Ayr lighthouse on the North Coast of Wales, which I saw in a Facebook group! I could see straight away it would be easy to make a lovely card!

I masked off the top of the card using a post it note & worked on the bottom part first, using Crushed Curry, Terracotta Tile & Night of Navy to sponge the sea.

I then positioned a circle cut from another post it note, so that it was in the correct position for the light reflection that I'd already created & then repositioned my larger post it note to mask off the bottom half.

I then sponged the top half, finally removing the circle & sponged again with Crushed Curry, to give the Sun some colour.

I stamped the lighthouse from Sailing Home, and the strip of land from Waterfront in Memento Tuxedo Black. then coloured both in using a dark Stampin' Blends pen, to get the full silhouette effect.

I mounted the image on a piece of Night of Navy Cardstock to help frame it, and attached that to a card base made from Bumble Bee Cardstock.

Hope you like it!

Thanks for stopping by

Jane x


Friday 5 June 2020

New Annual Catalogue Week - Project No 5


To celebrate our new Annual Catalogue, & our lovely new In-Colours, I'm bringing you 5 projects, which are all variations on a theme, of fold flat boxes & bags.

Todays box, using the new in colour Magenta Madness, was inspired by a very similar box made by fellow demonstrator Jay Soriano of Mitosu Crafts (check out their blog here). When I saw Jay making this one, I thought it would fit perfectly with my theme for this week. I've made some very minor changes to Jay's box, but it is his design. Fabulous isn't it!


Hope you like it!

Thanks for stopping by

Jane x

Instructions:

You will need 1 piece of 6" x 6" in-colour DSP in Magenta Madness

Trim your DSP down to 6" x 5 1/4" (15cm x 14cm)

Score on the long side at 1 1/4", 4 3/4" (3cm, 12cm)
and on the short side at 3/4", 1 1/2", 2 1/4", 3 3/4", 4 1/2" (2cm, 4cm, 6cm, 10cm, 12cm)

Remove the sections marked on the template below, and round the corners on the resultant flap.

Using a ruler & your scoring tool score diagonal lines as shown in the template. 


Fold & burnish all your score lines, Noting that both vertical score lines should be Mountain folds. The Horizontal & diagonal score lines marked with an M should be Mountain folds, and those marked with a V should be Valley folds. 

Fold in the side sections (fold on the vertical folds) & You should now be able to form your box, ensuring that all folds remain as mountain or valley according to how they were marked on the template.

Tuck the flap into the pocket formed between the end panel and the folded in corners. 

Thursday 4 June 2020

New Annual Catalogue Week - Project No 4


To celebrate our new Annual Catalogue, & our lovely new In-Colours, I'm bringing you 5 projects, which are all variations on a theme, of fold flat boxes & bags.

Todays box, using the new in colour Just Jade, was inspired by a very similar box made by fellow demonstrator Sally Stampers (check out her blog here) To fit in with my theme for this week I've changed her design a little, making it into a fold flat box.


Hope you like it!

Thanks for stopping by

Jane x

Instructions:

You will need a piece of Cardstock 8 1/4" x 9" (21cm x 22.5cm)

4 panels of DSP 4" x 1 3/4" (10cm x 4cm) layered on Whisper White 4 1/8" x 1 7/8" (10.5cm x 4.5cm)

Score on the short side at 2", 6 1/4"     (5cm, 16cm)
   and on the long side at 2", 4", 6", 8" (5cm, 10cm, 15cm, 20cm)

Remove the sections marked on the template below, and round the corners on the resultant flap.

Using a ruler & your scoring tool score diagonal lines as shown in the template. 


Fold & burnish all your score lines, Noting that both vertical score lines should be Mountain folds. The Horizontal & diagonal score lines marked with an M should be Mountain folds, and those marked with a V should be Valley folds. 

Decorate by adhering the DSP panels on to the centre panels of your project.

Fold in the side sections (fold on the vertical folds) & You should now be able to form your box, ensuring that all folds remain as mountain or valley according to how they were marked on the template.

Tuck the flap into the pocket formed between the end panel and the folded in corners. 

Wednesday 3 June 2020

New Annual Catalogue Week. Project No 3


To celebrate our new Annual Catalogue, & our lovely new In-Colours, I'm bringing you 5 projects, which are all variations on a theme, of fold flat boxes & bags.

Todays project is this simple box made in the lovely new Misty Moonlight, and as with all of this weeks projects it will fold flat for storage.


Hope you like it!

Thanks for stopping by

Jane x


Instructions:

You will need a piece of cardstock measuring 8 1/4" x 11" (21cm x 28cm)

To decorate it you will need

1 panel   of DSP 4"   x 2 3/4" (10cm x 6.5cm) layered on Whisper White 4 1/8" x 2 7/8"  (10.5 x 7cm)

2 panels of DSP 4"  x 1 3/4" (10cm x 4cm)   layered on Whisper White 4 1/8" x 1 7/8" (10.5 x 4.5cm)

2 panels of DSP 2 3/4" x 1 3/4" (6.5cm x 4cm)  layered on Whisper White 2 7/8" x 1 7/8" (7 x 4.5cm)

Score on the short side at 2", 6 1/4".        (5cm, 16cm)
   and on the long side at 2", 5", 7",10"    (5cm, 12.5cm, 17.5cm, 25cm)

Using a ruler and your scoring tool, score diagonal lines as in the template below.

Remove the sections marked in the template, and round the corners of the resultant flap. 


Fold & burnish all score lines, then decorate with the panels as in the picture below.

Fold the whole side sections in towards the middle, then pull the side panels (the decorated section) up to form the sides of the box. Fold the top over & tuck the flap into the pocket made on the other end by the folded in corner sections. 

Decorate as you wish! 


Tuesday 2 June 2020

New Annual Catalogue Week, Project No 2


To celebrate our new Annual Catalogue, & our lovely new In-Colours, I'm bringing you 5 projects, which are all variations on a theme, of fold flat boxes & bags.

Todays project is this cute little clutch bag. It's similar to yesterdays project, but this one needs no glue!


I've made this little bag in the fabulous new colour Bumble Bee! Unfortunately, I haven't yet got the new ribbon in this colour, but I think this retired Crushed Curry ribbon worked quite well!

Hope you like it!

Thanks for stopping by

Jane x

Instructions:

All you need is 1 piece of 6" x 6" In-Colour DSP in Bumble Bee

Score at 1 1/2", 4 1/2"     (3.8cm, 11.4cm)
turn through 90° and score at 3/4", 2 3/4", 4".  (2cm, 7cm, 10.2cm)

Remove the 2 sections marked in the template below, and round the corners of the resultant flap.

Fold & gently burnish your score lines.

Fold your 1 1/2" sides in to meet in the middle.

Hold the project in the top left hand corner with one hand. With the other hand, put your finger under the left hand flap in the centre. pull it back, until the score line next to your finger, lines up with the vertical score line, forming a diagonal crease. gently burnish the crease.

Repeat for all 4 corners. If you unfold your project, it should now look something like this.


Fold the sides in and fold up the bag, using the centre sections to form the sides. push your fingers into the side sections to gently crease them.


You should now be able to tuck the flap into the pocket formed between the centre bottom of the template and the folded in flaps, forming your clutch bag.

Decorate with a ribbon.