Monday, 18 January 2021

Bay Window Card Using Hydrangea Hill & Butterfly Gala


Another Fancy Fold Card for you this week. This time it's a Bay Window Card. 

I love the Hydrangea Hill suite of products, but haven't yet got the stamps & die bundle, so I've paired it with the Butterfly Gala stamp set & punch. 

It's a really easy card to make,

Hope you like it

Thanks for stopping by

Jane x


Instructions 


Cardstock : 4 1/8” (10.5cm) x A4 length

                  Score on long side @ 3/8”, 4 1/2” (1, 11.5cm)

                  Flip cardstock over, top to bottom, 

                  and score @ 1 3/4”, 3 1/8”, 5 7/8” (4.5, 8, 14.9cm)


DSP 1 (choose a pattern that could be a view from a window) : 

                 3 strips, 4” x 1 1/4” (10.2 x 3.2cm)


DSP 2: (choose a plainer pattern)  4” x just under 3” (10.2 x 7.5cm)

                Cut strips measuring - 1 of  4" x 1 1/4" (10.2 x 3.2cm)

                                                1 of  4" x 1 3/8" (10.2 x 3.7cm)

                Keep remaining strip for the narrow section on the card. 


Punched/die cut greeting 1 1/2” (4cm) wide


Piece of paper/card for signing measuring 4” x 3” (10.2 x 7.5cm)


Thursday, 7 January 2021

Sunburst Card Using Oh so Ombre Saleabration papers


I recently saw a video by fellow demonstrator Angie Oldenberg, making a card very similar to the Rococo Rose card below. I loved the way she made the card, and the effect produced by the way she had used the Oh so Ombre papers. Isn't it lovely?!


The papers are not only gorgeous, but they are also FREE with Saleabration! For every £45 you spend, you can earn a free level 1 item of your choice from the Saleabration catalogue. If you spend £90 you can choose 2 level 1 items or 1 level 2 item. But be quick - Saleabration ends on 28th February, and items are only available while stocks last!

The Ombre effect on the plain papers runs from side to side, which works well with the standard method of cutting strips of paper & then cutting them diagonally to get your sunburst effect. But, the effect on the patterned Ombre papers runs from corner to corner, so I needed a different method of cutting the paper. I love a challenge, so I devised a different way to cut the strips! 


Hope you like it

Thanks for popping by

Jane x


Instructions

3 3/4” x 5 1/2” (9.5 x 14cm) scrap card ( I started with 3 7/8" x 5 5/8" then trimmed to size later.) 

Draw a line at the centre on the long side.


DSP 6” x 6” (15.2 x 15.2cm) Choose a paper that either has a diagonal contrast, such as the patterned ombre paper, or has 2 toning but contrasting sides. 


Cut DSP diagonally, then cut both triangles the same.


Line up the right angle on the cutting line of your trimmer, pointing downwards. Line up one of the other points at 1” (2.5cm) & cut. 


Keeping the same corner lined up on the cutting line, move the top corner, on the same side as before, to the 1” & cut again. 


Repeat until you have either 3 or 4 strips.


Keeping the same bottom corner still lined up on the cutting line, move the other top corner to the 1” mark & cut.


Repeat until all the paper is cut.


NB keep the pieces in order as you cut them. 


Depending on whether you cut 3 or 4 pieces before swapping sides, your pieces will now look like one of these. Note that in both cases, I have numbered the pieces from 1-8, such that number 4 is the smaller piece left over when you finished cutting.


Now adhere the pieces to the scrap card as in the diagram below. All of the L’s are one side of the paper, and D’s are the second side. Or in the case of ombre paper, use the lighter triangle for L & the darker for D. 


Trim away the overhanging paper & adhere to a card base. Use a die cut or punched greeting to cover the central join. 

Wednesday, 23 December 2020

Lidded Pyramid Box Using In the Pines Stamp Set


It's almost Christmas, so time for my final Christmas table favour of the series! This time I've taken inspiration from a very similar origami box I've seen, but this one doesn't use origami! 

It's a 2 part box - a small sloping sided box to put some goodies in, and a pyramid lid. I designed the box & then realised that it was the perfect size for the larger tree from the In the Pines stamps, so I've stamped & heat embossed one on each side. 

If you prefer, you could make it out of DSP, as it just takes 2 pieces of 6" x 6" paper. I've also made some from the lovely Feels Like Frost papers, although in the example below, I used more strands of ribbon!


Hope you like it!

Thanks for stopping by

Jane x


Instructions:


Base


6”x 6” paper


On all 4 sides, Score @  7/8”, 1 3/4” & mark @ 2 1/2”, 3 1/2”


Score lines from each corner of the centre square to each of the 2 closest marks. as in 1st diagram below  


Remove sections as in 2nd diagram.


Adhere tabs, noting that the slides should slope in.


Fold over & adhere 2 adjacent flaps


Position approx 15-18” twine or ribbon so that the centre is between the 2 flaps that haven’t been glued down.


Fold over & adhere the flaps so that ribbon is held under the flaps, with the loose ends coming out of 2 opposite corners. 


LID


Score on wrong side @ 3”. Turn 90° & repeat.


Turn to right side & mark @ 1 3/4”, 4 1/4” on all 4 sides


Score across the corners from mark to mark as in 1st diagram.  


Now score lines across from each end of each of those score lines to the opposite end of the score line diagonally opposite, as in the 2nd diagram.


Assemble as instructed in the video. 

Thursday, 3 December 2020

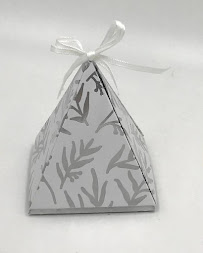
Christmas table favour #5 Pyramid Box Using Feels Like Frost DSP


This fun little box is the latest in my series of Christmas table favours and is about the right size for a chocolate!

I got the idea from a similar shaped box I saw that Mitosu Crafts had made, although they made theirs in a different way from mine!

For this one, I've used the Beautiful Feels Like Frost paper, and a piece of our Whisper White crinkled seam binding ribbon.

Hope you like it

Thanks for stopping by

Jane x


Instructions:

4” x 4” DSP or other square piece of DSP (works best in multiples of 1"/4cm)


Mark each side at 3/8 of the way from each end for this example that is 1 1/2", 4 1/2”


Score diagonal lines from the LH mark on one side to the RH one on the next side clockwise.


Repeat for all sides


Score diagonal lines from each corner of resultant centre square to each of the adjacent corners of the paper


Cut away the triangles marked on the template


Fold & burnish


Punch a hole in each point & use ribbon to close


Monday, 30 November 2020

Christmas Cracker for a Lipstick using Feels Like Frost DSP


I've been teaching my zoom class a selection of Christmas table favours recently. Nothing says Christmas table more than a Christmas cracker!

The cracker I taught them uses a piece of 6" x 6" DSP (Designer series paper) and would fit a couple of chocolates inside, I'll give you the instructions for that one below. 

As one of my class wanted to gift some lipsticks, I've designed this cracker to perfectly fit a lipstick. It uses 4" x 6" DSP,  so you'd get 6 out of a piece of 12" paper! 

For this one I've used the beautiful Feels Like Frost DSP & tied it with some of our Seaside Spray Metallic Ribbon.

Hope you like it

Thanks for stopping by

Jane x


Measurements:

For the Lipstick Sized Version:


Start with 4" x 6" (10.2cm x 15cm)

Score Short side @ 7/8", 1 3/4", 2 5/8" 3 1/2" (2.3, 4.6, 6.9, 9.2cm)

& on the long side @ 3/4", 1 1/2", 4 1/2", 5 1/4" (1.7, 3.5, 11.5, 13.3cm)

Flip top to bottom & score @ 1 1/8", 4 7/8" (2.6, 12.4cm)


For the Chocolates sized version:


Start with 6” x 6” ( if using metric trim to 15 x 15.2cm)

Score (LS) @ 1 3/8”, 2 3/4”, 4 1/8”, 5 1/2” (3. 5,7, 10.5, 14cm)

Turn 90° & score @ 1”, 2”, 4”,5” (2.5, 5, 10, 12.5cm)

Flip top to bottom & score at 1 1/2”, 4.5” (3.75, 11.25cm)


Alternatively, To make numbers easier in metric trim to 14 x 15.2cm

Score LS @ 3. 5, 7, 10.5, 14cm

Turn 90° & score @ 3, 5, 9, 11cm 

Flip top to bottom & score at 4, 10cm


Thursday, 26 November 2020

Christmas Table Favour #3 Hexagonal Twist Close Box


 One of the lovely things about being a Stampin' Up! demonstrator is sharing ideas & inspiration with fellow demonstrators. In a recent zoom meeting one of my friends & fellow demonstrator showed us a beautiful box she'd made. You can see her video here

As soon as I saw her box, I knew a smaller version would make a lovely table favour. So I've designed this one, which is just the right size for a Lindor chocolate. Yummy!

Hope you like it

Thanks for stopping by

Jane x


Instructions:


Start with 4 7/8” x 3 3/8” (13 x 8.8cm)


Score on LS @ 3/4”, 1 1/2”, 2 1/4”, 3”      , 3 3/4”, 4 1/2” (2,4,6,8,10,12cm)

        & mark @ 3/8”, 1 1/8”, 1 7/8”, 2 5/8”, 3 3/8”, 4 1/8” (1 ,3,5,7,9 ,11cm)


Turn 90ยบ so that the narrow section is at the bottom & score @ 1 5/16”, 2 11/16” (3.5,7cm)


On reverse side, Score diagonal lines from the mark to the bottom LH corner of each rectangle that makes up lid.


Fold & burnish all score lines.


Round lid corners (optional).


Monday, 23 November 2020

Christmas Bauble Using Feels Like Frost DSP


I've been asked recently to do a video for this lovely Christmas Bauble. I first saw how to make these on a video from a German Stampin' Up! demonstrator, Jana Muller. Although her video is in German, I managed to follow how she was making them.

For my version I thought I'd make a slightly smaller version, using Feels Like Frost 6" x 6" paper. I'll include the measurements for the larger version, as well as my smaller version, below. The method of putting it together is exactly the same whichever size you choose to make, although you'll need a slightly larger circle to score around, for the larger version. 


Hope you like it

Thanks for stopping by

Jane x


Instructions:

For the smaller bauble, start with a piece of DSP measuring 6" x 3 3/8"(15.2 x 9cm)

Score on the long side @ 1/2", 2 1/8", 3 1/4", 4 7/8", 5 1/2" (1.5, 5.7, 8.7, 12.9, 14.4cm)

Cut into 3 strips each measuring 6" x 1 1/8" (15.2 x 3cm)

Use a circle measuring approx 2 1/8" (5.4cm) as a guide for scoring the arcs. eg 2nd smallest stitched circle die or the 4th smallest layering circles die.


For the larger bauble, start with a piece of DSP measuring 8 1/4" x 4 1/2"(21 x 12cm)

Score on the long side @ 3/4", 3", 4 1/2", 6 3/4", 7 1/2" (2, 7.5, 11.5, 17,19cm)

Cut into 3 strips each measuring 8 1/4" x 1 1/2" (21 x 4cm)

Use a circle measuring approx 2 5/8" (6.7cm) as a guide for scoring the arcs. eg 2nd largest stitched circle die or the 3rd largest layering circles die.